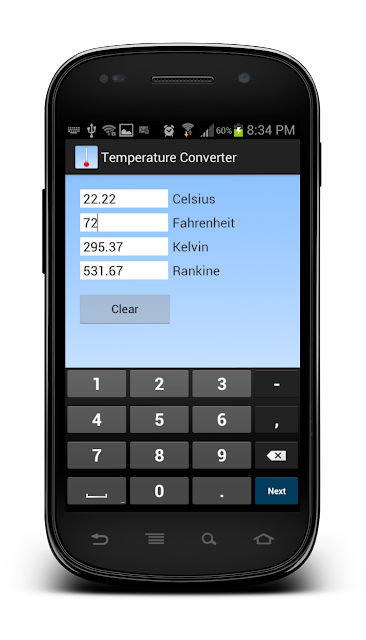
After playing around with Android development a few years ago, then getting frustrated with Eclipse and then having two kids, my Android development was put on the backburner until recently - when I downloaded Android Studio. Based on Intelli-J, Android Studio is THE place for Android development - at least for me. While I already have a few apps planned (along with the longer term goal of getting into game development), I decided to do a simple, first app just to go through the entire process of designing, coding, testing, and deploying an Android app to Google Play. I give you (drum roll please)... Temperature Converter! Yes! Because if there is one app we need more of, its temperature converter apps! Let's face it, dozens, if not more temperature converters just isn't enough! So, show me some love and support and download my app, then drop me a line on my app's Google Play store front!
Wednesday, December 4, 2013
Saturday, November 19, 2011
The easiest way to package and deploy a Sharepoint workflow
Note: this relates to packaging up MOSS 2007 workflows created in Visual Studio.
If you have developed your workflow in Visual Studio and have already been F5 deploying it (which means you have already created your feature.xml and workflow.xml), and now you are ready to package it up into a wsp for deploying to other servers, then the following is probably the quickest way of doing that.
Essentially, it involves using WSP Builder. However, this method doesn't require using any of the WSP Builder project templates to do it. The templates are useful if you create your workflow project from the WSP Builder templates to begin with. But if you created your workflow with the normal Visual Studio workflow templates, THEN want to use WSP Builder templates for packaging the workflow, its a bit of a pain to do. This will enable you to get your .wsp with the absolute minimum in changes to your Visual Studio project.
1. install WSP Builder, then load Visual Studio and your workflow project
2. in your Project, create 12/TEMPLATE/FEATURES/your_feature_name
3. copy feature.xml, workflow.xml, and your InfoPath task forms (.xsn's) into this folder
4. right-click your project, click WSPBuilder -> Build WSP
WSP Builder will automatically
1. build your manifest.xml for you, adding in everything it sees in your 12 folder structure
2. get your project's assembly (.dll)
3. package it all into a .wsp file and drop it in the root of your project
Below are my installation and removal scripts.
rem Workflow installation script
d:\stsadm -o addsolution -filename d:\deploy\MyWorkflowProject\MyWorkflowProject.wsp
d:\stsadm -o deploysolution -name MyWorkflowProject.wsp -immediate -allowGacDeployment
pause
d:\stsadm -o activatefeature -name MyWorkflowProject -url http://server_to_deploy_to
rem Workflow removal script
d:\stsadm -o deactivatefeature -name MyWorkflowProject -url http://server_to_deploy_to
d:\stsadm -o retractsolution -name MyWorkflowProject.wsp -immediate
pause
d:\stsadm -o deletesolution -name MyWorkflowProject.wsp -override
Tuesday, October 18, 2011
How to email members of a SharePoint group
This relates to MOSS 2007.
In doing a state machine workflow, I have noticed how you can assign a SharePoint group to a task no problem, but when you set that group as the recipient of an email activity, you get an error. I wrote a very simple function that takes in the SharePoint group's name as a parameter and returns a semi-colon delimited string of the email addresses of the people in the group. I also had another scenario where I wanted to get the login names of the individuals in the group, too, so I made another parameter that acts as a switch - you choose whether you want login names or email addresses. Just assign the function below to your email task's To property and you are good to go!
To get the email addresses of members in a SharePoint group called "Account Personnel" and then assign them to an email activity's To property, type:
MyTaskEmail_To = GetGroupInfo("Account Personnel", "EMAIL_ADDRESSES")
In doing a state machine workflow, I have noticed how you can assign a SharePoint group to a task no problem, but when you set that group as the recipient of an email activity, you get an error. I wrote a very simple function that takes in the SharePoint group's name as a parameter and returns a semi-colon delimited string of the email addresses of the people in the group. I also had another scenario where I wanted to get the login names of the individuals in the group, too, so I made another parameter that acts as a switch - you choose whether you want login names or email addresses. Just assign the function below to your email task's To property and you are good to go!
Private Function GetGroupInfo(ByVal GroupName As String, ByVal WhatToGet As String) As String
'PURPOSE: returns semicolon-separated string of group member login names or email addresses
Dim strReturnString As String = ""
'get group
Dim TheGroup As SPGroup = workflowProperties.Web.SiteGroups(GroupName)
'loop through group and build string of login names or email addresses
For Each GroupMember As SPUser In TheGroup.Users
If WhatToGet = "LOGIN_NAMES" Then
If strReturnString = "" Then
strReturnString = GroupMember.LoginName
Else
strReturnString = strReturnString & "; " & GroupMember.LoginName
End If
ElseIf WhatToGet = "EMAIL_ADDRESSES" Then
If strReturnString = "" Then
strReturnString = GroupMember.Email
Else
strReturnString = strReturnString & "; " & GroupMember.Email
End If
End If
Next
Return strReturnString
End Function
To get the email addresses of members in a SharePoint group called "Account Personnel" and then assign them to an email activity's To property, type:
MyTaskEmail_To = GetGroupInfo("Account Personnel", "EMAIL_ADDRESSES")
Tags:
SharePoint group,
task emails
Workflow task link in email
Just wanted to do a quick post on a recent gotcha. I created a MOSS 2007 state machine workflow and added custom email activities to send emails notifying users of their tasks. I wanted to have a link in those emails that pointed directly to the user's task, ie the same link you get when you enable "Send e-mail when ownership assigned?" in the task list's Settings -> List Settings -> Advanced settings screen.
I thought I could simply reference the task's ListItemId property, but it kept coming up as -1. After finding an article on SharePoint Tricks, I realized I needed to create a Field variable for the ListItemId property, then reference the Field variable.
1. In the create task activity, create a Field from the ListItemId (by default it says -1).
2. The link in the email concatenates workflowProperties.SiteUrl, workflowProperties.TaskListUrl, "/DispForm.aspx?ID=", and finally createMyApprovalTask_ListItemId.ToString()
This will link directly to the user's task form on the SharePoint site.
That's it!
Tags:
workflow task emails
Wednesday, September 28, 2011
How to remove a SharePoint solution that is giving an error
A while back I had a solution that would just not be removed. In the Solution Management screen in Central Administration, the Status for the solution was a bright red "Error". Attempting to remove it from there would give an error.
Luckily, I found a great post by Alex Thissen that clearly explains how to use stsadm to remove a malfunctioning solution. The blog post is called Remove malfunctioning Windows SharePoint Services solutions.
In a nutshell, if retracting the solution:
stsadm -o retractsolution -name solutionname.wsp -immediate
doesn't work, and if deleting the solution:
stsadm -o deletesolution -name solutionname.wsp -override
doesn't work, then
1. run an enumeration to see the scheduled deployments
stsadm -o enumdeployments
2. use the JobId to cancel the deployment
stsadm -o canceldeployment -id 2529c788-971c-46a3-b69f-a2a0a1fcc851
Afterwards, you can verify it by doing 1. again.
Tags:
error,
malfunctioning,
sharepoint,
solution
Subscribe to:
Posts (Atom)